Creating an EC2 Instance
EC2 Services: How to Create a New EC2 Instance
Here's a step-by-step guide to creating a new instance in the AWS EC2 dashboard.
Launching an EC2 Instance
To start, go to the EC2 dashboard:
- Click on the 'Instances' option on the left side panel.
- Click on the 'Launch instance' button on the screen that loads.
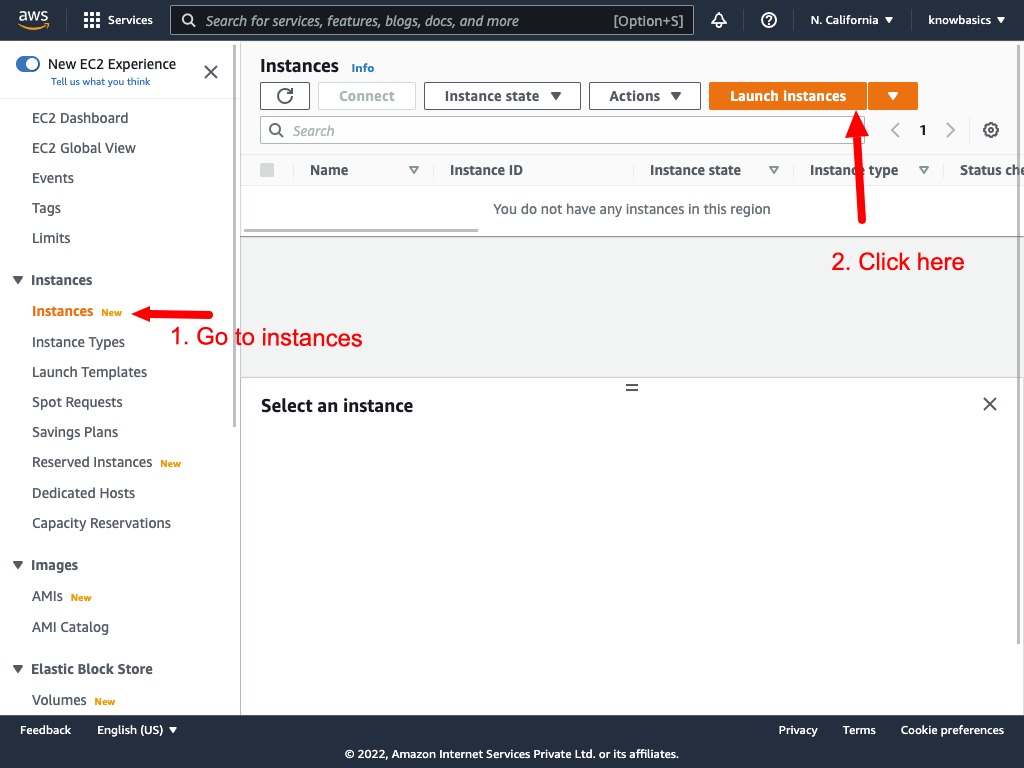 This process will start a wizard that guides you through creating an AWS instance. Currently, AWS offers a new UI as a beta launch option, which I prefer, as it's likely to become the standard in the future.
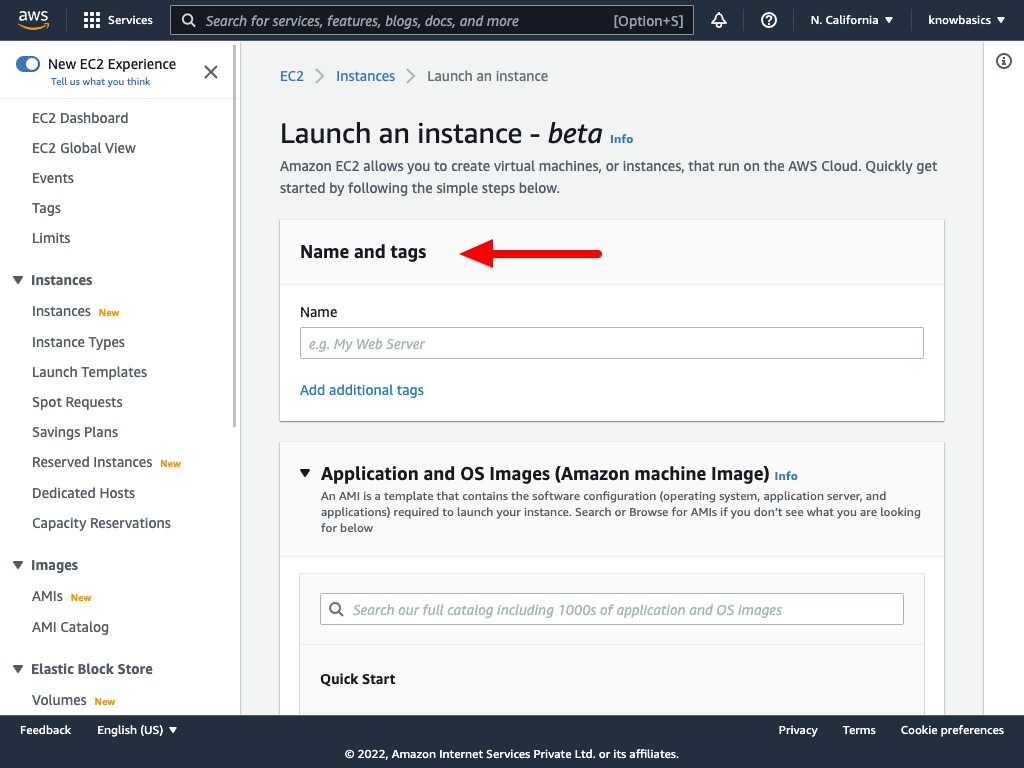
In the classic UI, you would see the instance creation steps in a wizard format. In the new UI, these steps are presented on a single page in separate sections.
Steps to Create an Instance
The page for creating a new instance includes the following steps:
- Naming and adding tags
- Choosing the application and OS images
- Selecting the instance type
- Setting up a key pair for login
- Configuring network settings
- Configuring storage
- Entering advanced details
- Reviewing a summary
Naming and Adding Tags
In the section shown below, enter a name for your server in the 'Name' input box. For example, "Knowbasics Front End" might be the name for a server intended to run the front-end application of your app. You can add more tags to your instance by clicking 'Add additional tag.'
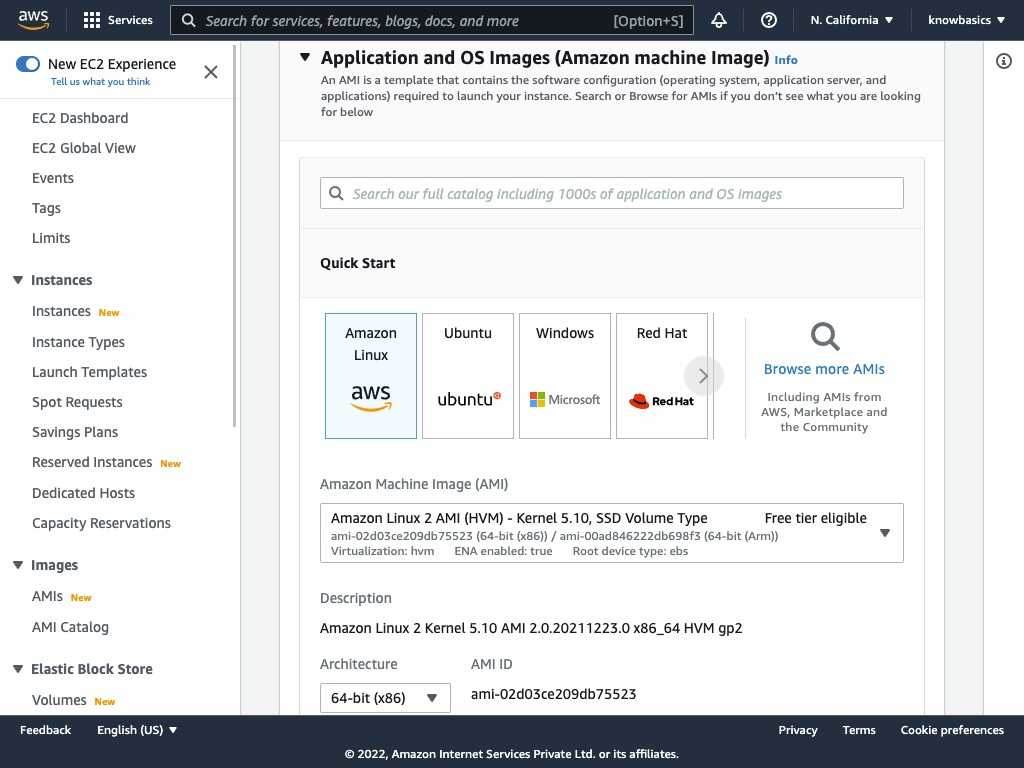
Choosing Application and OS Images
AWS supports various AMIs (Amazon Machine Images). These are deployable files for AWS machines. AWS offers both open-source and paid versions of basic OS images, as well as ready-to-use application packages.
For instance, you can choose images related to Linux, Mac OS, or Windows, or select application server images like a node.js or Apache Kafka third-party AMI, which you can deploy and start using directly.
Clicking on 'Browse more AMIs' will open a window where you can search through:
- Quick start AMIs
- My AMIs
- AWS Marketplace AMIs
- Community AMIs
For this exercise, I will choose the default Amazon Linux option.
Choosing the Instance Type
The instance type specifies the CPU power and memory you need. AWS offers a wide range of options to suit different needs. By clicking on 'Compare instance types,' you can explore all the available instances. Remember, the more powerful the instance, the higher the cost. For this exercise, I will select the t2.micro, which is eligible for the Free tier.
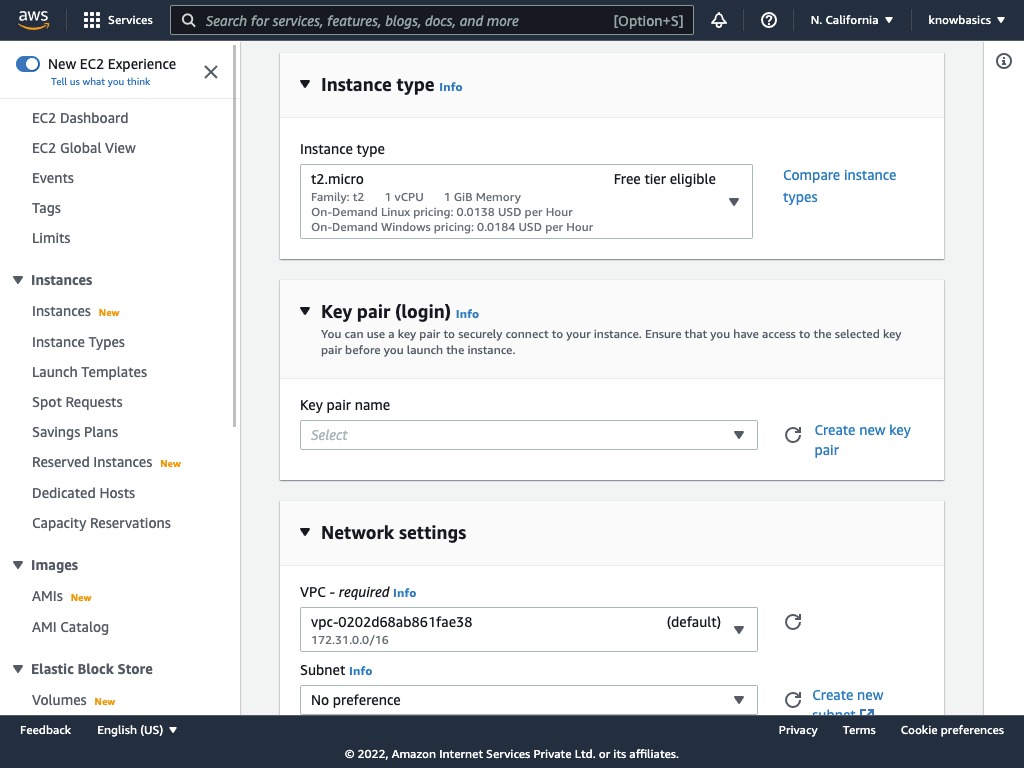
Setting Up a Key Pair
The key pair feature is used to securely connect to your instance. The default option is to proceed without a key pair, but this is not recommended. If you have previously created a key pair, you can select it and proceed. However, it's generally advised to create a new key pair for each instance.
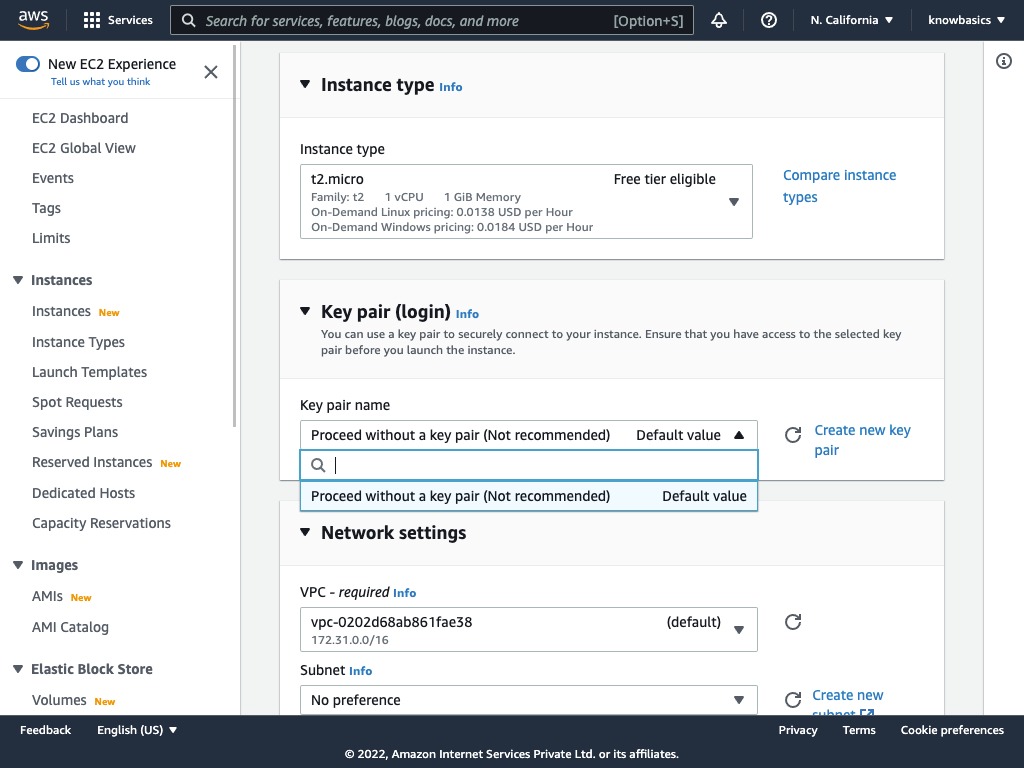
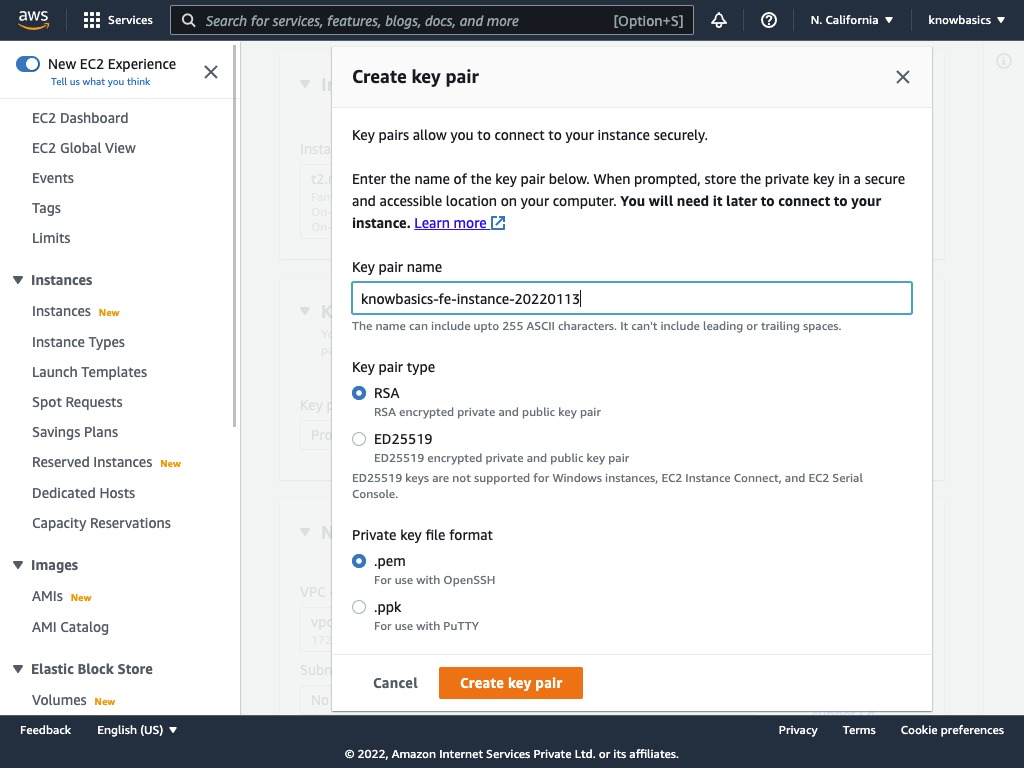
Creating a New Key Pair
Key pairs enable secure SSH connections to your instance. It's important to keep the private key safe. As long as you have the private key, you can generate a public key to connect to your instance. To learn more about key pairs, please refer to my other blog post [here [TODO]].
Creating a key pair in AWS involves three steps:
- Choosing a key pair name
- Selecting a key pair type (RSA or ED25519)
- RSA (Refer https://en.wikipedia.org/wiki/RSA_(cryptosystem))
- ED25519 (Refer https://en.wikipedia.org/wiki/EdDSA#Ed25519)
- Picking a private key file format (.pem for Open SSH, .ppk for PuTTY)
Select your preferred settings or go with the shown options if you're unsure. Once the key pair is created, select it from the dropdown.
If you lose the key pair, you won't be able to connect through SSH to your instance. However, you can still connect through CloudShell and replace it with a new KeyPair later by following this document link. This is a more advanced process, so it's better to keep your private key safe.
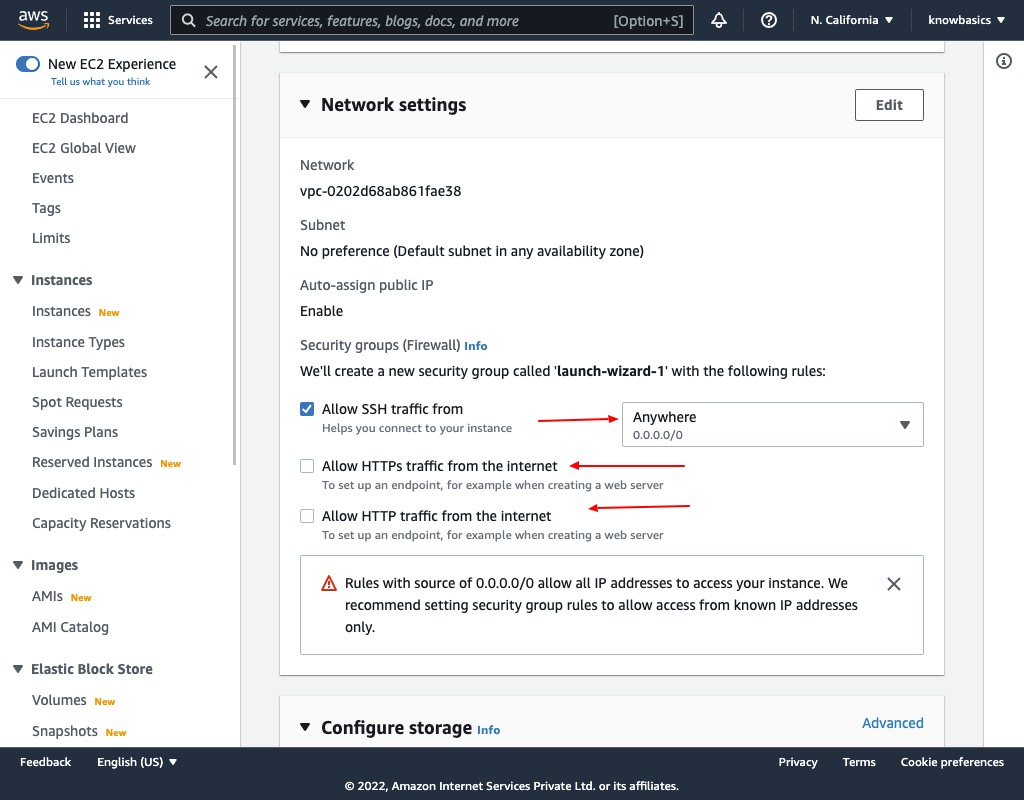
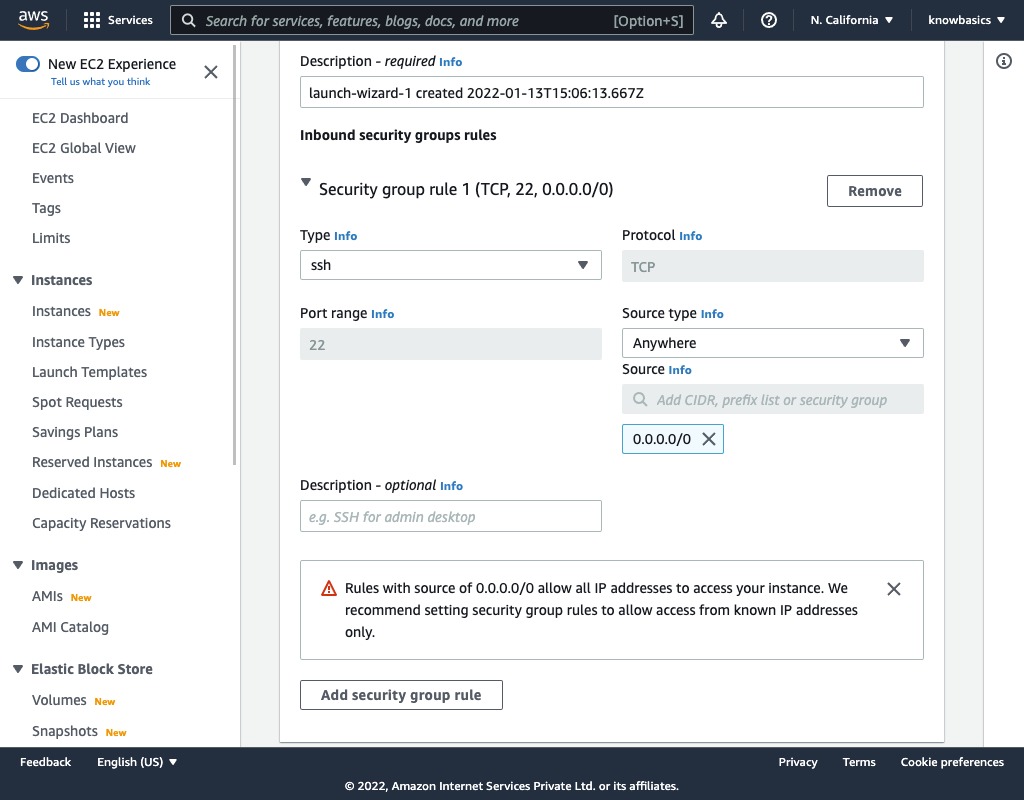
Configuring Network Settings
Network settings allow you to set up firewall restrictions, public IP configuration, network security group setup, etc.
 The simple view of network settings is shown above.
By default, you can connect to your instance from anywhere using SSH. However, it's recommended to explicitly add the IP ranges of your host machine for connecting to this instance. Alternatively, you can select 'My IP,' but if your IP is dynamic and changes frequently, you'll need to update this setting each time your IP changes.
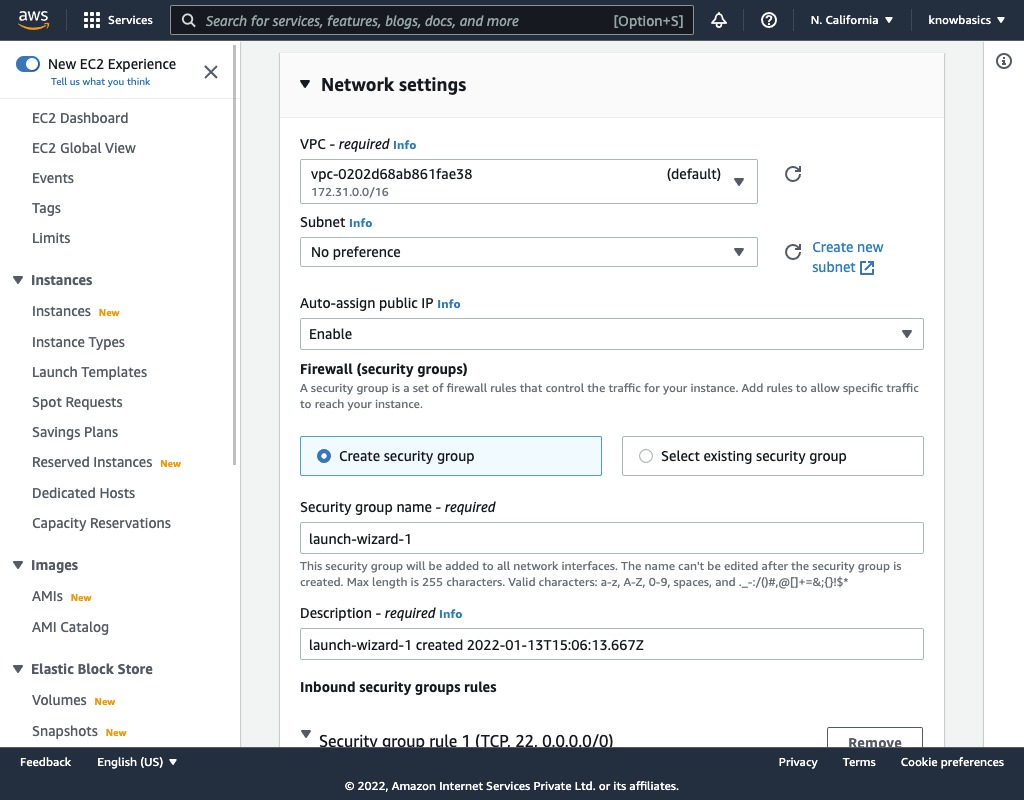 Also, by default, access to HTTP (port 80) and HTTPS (port 443) protocols is not available. You should enable them by clicking on the checkbox, or you can add them from the advanced view by clicking on the 'Edit' button. If your instance fails to launch, temporarily disable HTTPS traffic.
Configuring Storage
This section lets you add the necessary storage to your image. You can create a new volume for your instance or attach an existing volume. Switching to the advanced view provides more options. Let's go with the default options for now.
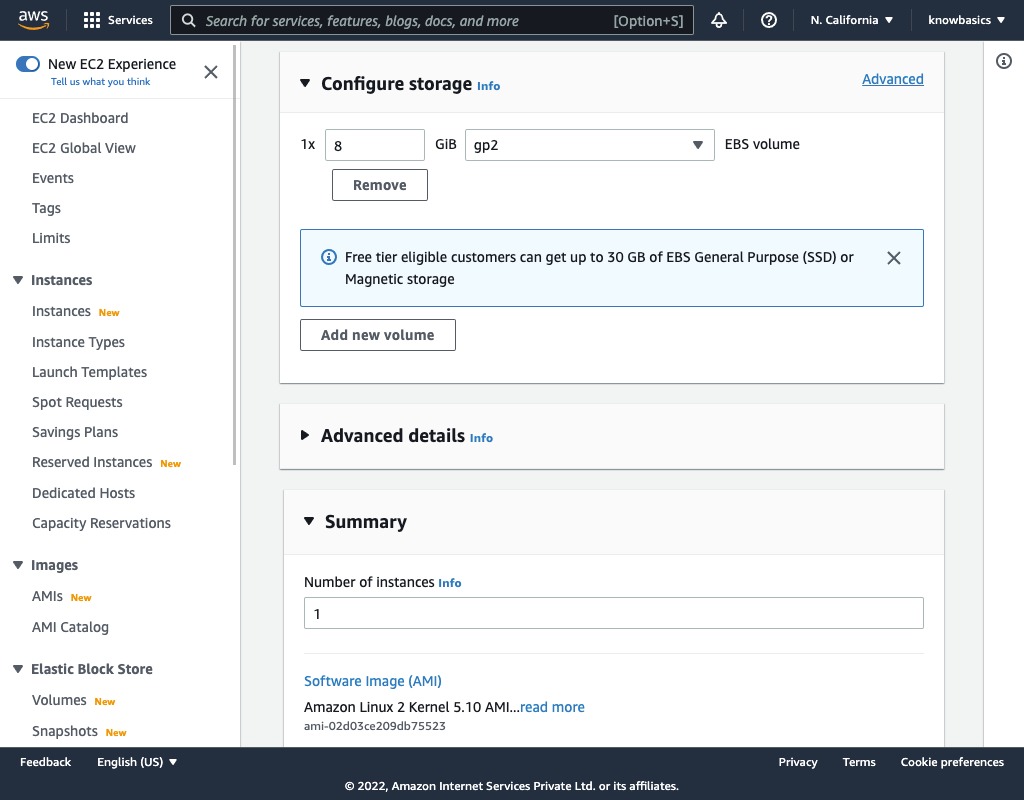
By default, the storage will be deleted upon termination of the instance. If you wish to keep it, change the 'Delete on termination' dropdown option to 'No'.
Advanced Details
In the advanced details section, you can configure more sophisticated settings. Although we may skip this for now, let's review the options to understand them better.
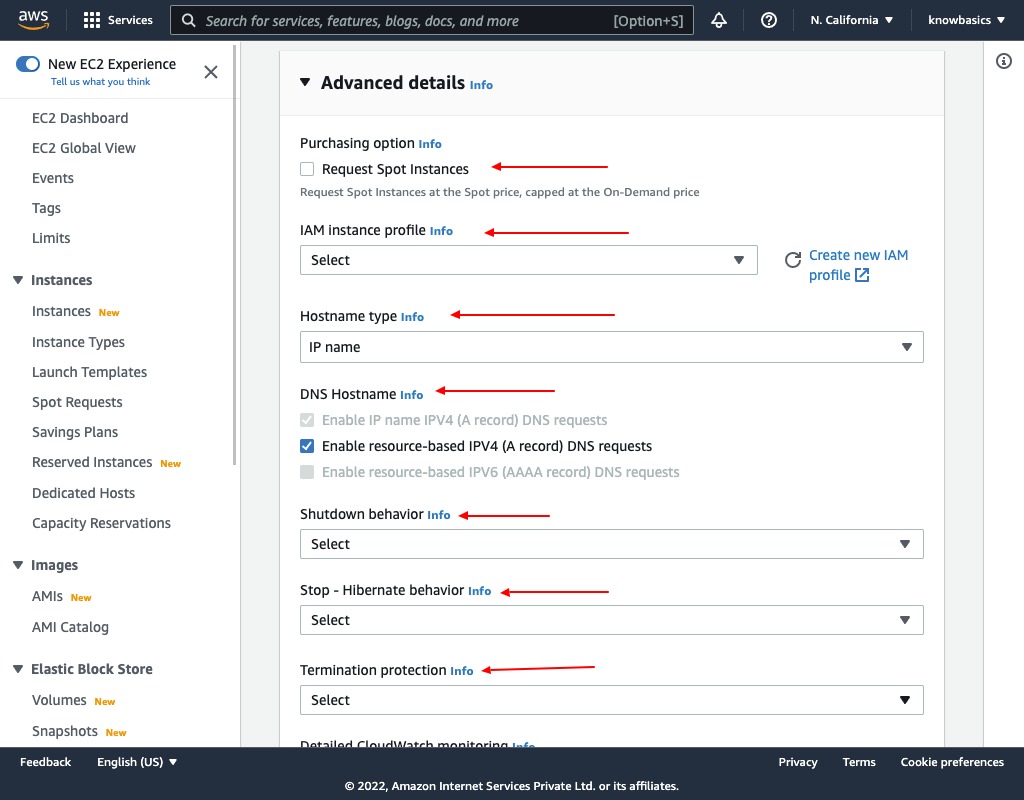
A. Spot Instances
Spot Instances are EC2 instances that you can claim with a 2-minute notification. They are particularly well-suited for applications that are:
- Stateless
- Fault-tolerant
- Flexible in timing
For more information on Spot Instances, visit here. As per AWS documentation, Spot Instances offer up to a 90% discount compared to On-Demand prices and are ideal for various applications. They integrate seamlessly with AWS services, providing an efficient way to manage applications.
Amazon EC2 Spot Instances provide an opportunity to utilize the unoccupied capacity in the AWS cloud. These instances are notably affordable, offering up to 90% lower prices than On-Demand rates. They are well-suited for a variety of tasks that don't require persistent state, can handle interruptions, or have flexible scheduling, including big data processing, containerized workloads, continuous integration/continuous deployment (CI/CD), web servers, high-performance computing (HPC), as well as testing and development.
Spot Instances are well-integrated with various AWS services, such as Auto Scaling, EMR (Elastic MapReduce), ECS (Elastic Container Service), CloudFormation, Data Pipeline, and AWS Batch. This integration allows for versatile ways to deploy and manage applications on Spot Instances.
Additionally, Spot Instances can be combined with On-Demand Instances, Reserved Instances (RIs), and Savings Plans to further balance costs with performance needs. Given AWS's extensive infrastructure, Spot Instances offer both scalability and cost-effectiveness for large-scale operations. Users also have the flexibility to pause, stop, or terminate these instances with a two-minute warning when AWS needs to reclaim capacity. This unique offering from AWS gives users access to an extensive range of unused computing resources at significantly reduced costs.
B. IAM Instance Profile
This option allows you to assign roles to your EC2 instance. You can create a new role by clicking on 'Create new IAM profile.'
C. Hostname Type
AWS generates a dynamic hostname for each instance created. You can choose between "IP name" and "Resource name" for this hostname.
D. DNS Hostname
Select the appropriate options for DNS hostname based on your requirements.
E. Shutdown Behavior
There are two options for shutdown behavior: "Stop" and "Terminate." The option selected will determine the instance's behavior upon shutdown. The default setting is "Stop."
F. Stop - Hibernate Behavior
You have the option to enable or disable hibernate behavior for your instance.
G. Termination Protection
Termination protection is crucial for preventing accidental termination of critical or production instances. Enable this option to protect your instance.
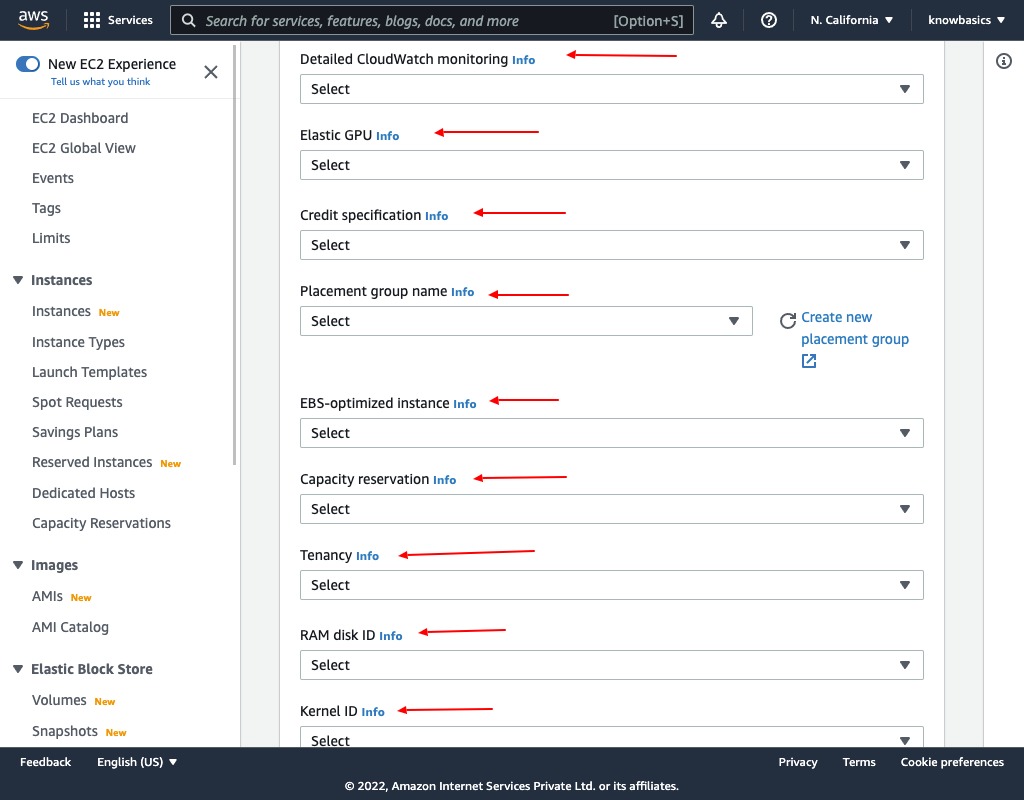
H. Detailed CloudWatch Monitoring
CloudWatch is a monitoring service ideal for DevOps engineers, developers, and others. It provides valuable data and insights for managing instances. More information can be found at AWS CloudWatch.
Info from AWS document Amazon CloudWatch is a monitoring and observability service built for DevOps engineers, developers, site reliability engineers (SREs), IT managers, and product owners. CloudWatch provides you with data and actionable insights to monitor your applications, respond to system-wide performance changes, and optimize resource utilization. CloudWatch collects monitoring and operational data in the form of logs, metrics, and events. You get a unified view of operational health and gain complete visibility of your AWS resources, applications, and services running on AWS and on-premises. You can use CloudWatch to detect anomalous behavior in your environments, set alarms, visualize logs and metrics side by side, take automated actions, troubleshoot issues, and discover insights to keep your applications running smoothly.
You can Enable / Disable this option from dropdown
I. Elastic GPU
This feature allows you to add GPU capabilities to your instance. Various capacities are available, and selecting more powerful options will incur higher costs.Learn more about AWS Elastic Graphics here
This option provides different capacities like below
- Eg1.medium
- Eg1.large
- Eg1.xlarge
- Eg1.2xlarge
Selecting more power will cost you more. Select an option from above or leave it as is.
J. Credit Specification
This dropdown offers two options: "Unlimited" and "Standard." Choose the one that best suits your needs.
K. Placement Group Name
Specify a placement group name if required.
L. EBS-Optimized Instance
EBS-optimized instances provide enhanced performance for I/O operations on EBS volumes. More information is available here.
M. Capacity Reservation
This feature allows you to reserve a certain capacity for your instance within a region. There are several options to choose from.
- None -- Prevents the instances from launching into a Capacity Reservation. The instances run in On-Demand capacity.
- Open -- Launches the instances into any Capacity Reservation that has matching attributes and sufficient capacity for the number of instances you selected. If there is no matching Capacity Reservation with sufficient capacity, the instance uses On-Demand capacity.
- Target by ID -- Launches the instances into the selected Capacity Reservation. If the selected Capacity Reservation does not have sufficient capacity for the number of instances you selected, the instance launch fails.
- Target by group -- Launches the instances into any Capacity Reservation with matching attributes and available capacity in the selected Capacity Reservation group. If the selected group does not have a Capacity Reservation with matching attributes and available capacity, the instances launch into On-Demand capacity. Learn more about capacity reservation here
N. Tenancy
This setting determines how your instances are distributed across physical hardware and affects pricing. There are three options available: "Shared," "Dedicated," and "Dedicated Host."
- Shared (default) -- Multiple AWS instances from multiple accounts will share same physical hardware.
- Dedicated -- the instance will run on single-tenant hardware.
- Dedicated Host -- the instance runs on dedicated isolated physical server with EC2 capabilities, that user can control.
O. RAM Disk ID
EC2 supports high-memory instances up to 24TB, suitable for memory-intensive applications. You can manage RAM disks and link them to your machine.
P. Kernel ID
Customize your instance with a specific kernel if needed.
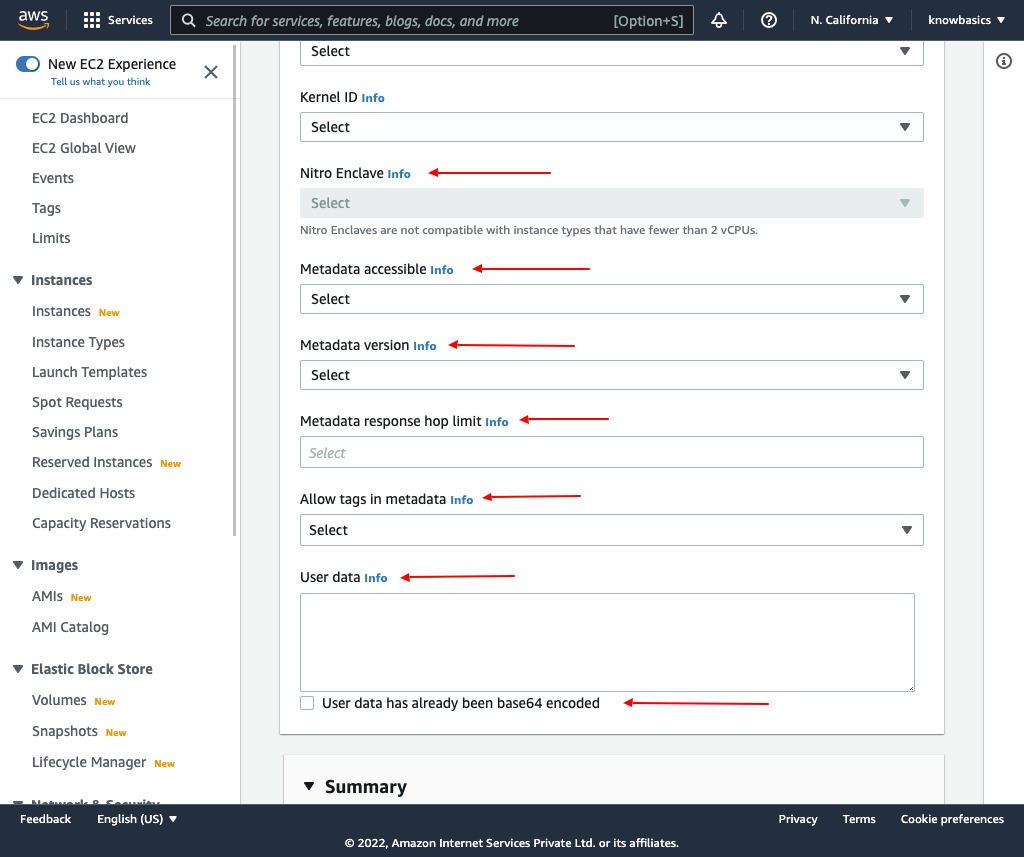
Q. Nitro Enclave
Nitro Enclaves enable the creation of isolated environments within your EC2 instance for processing sensitive data. More information is available here.
AWS Nitro Enclaves enables customers to create isolated compute environments to further protect and securely process highly sensitive data such as personally identifiable information (PII), healthcare, financial, and intellectual property data within their Amazon EC2 instances. Nitro Enclaves uses the same Nitro Hypervisor technology that provides CPU and memory isolation for EC2 instances.
Nitro Enclaves helps customers reduce the attack surface area for their most sensitive data processing applications. Enclaves offers an isolated, hardened, and highly constrained environment to host security-critical applications. Nitro Enclaves includes cryptographic attestation for your software, so that you can be sure that only authorized code is running, as well as integration with the AWS Key Management Service, so that only your enclaves can access sensitive material.
There are no additional charges for using AWS Nitro Enclaves other than the use of Amazon EC2 instances and any other AWS services that are used with Nitro Enclaves.
R. Metadata Accessibility
Configure the accessibility of your instance's metadata.
S. Metadata Version
Select the appropriate metadata version for your instance.
T. Metadata Response Hop Limit
Set the hop limit for metadata responses.
U. Allow Tags in Metadata
Decide whether to allow tags in your instance's metadata.
V. User Data
User data scripts run when the instance is created and launched for the first time. For example, you might want to install a web server as soon as the instance is ready. Copy the provided script into the user data section to set up a web server upon instance launch. Here is a sample from AWS document here this document do steps slightly different then our need.
#!/bin/bash
# The above comment is not just a comment but a configuration so it is mandatory.
sudo yum -y install httpd # install webserver
sudo systemctl start httpd # start webserver
sudo systemctl enable httpd # start webserver
cd /var/www/html # change the dir to webserver
sudo chown  ec2-user . # own the current directory
sudo chmod -R o+r . #change the execution mode
echo "<h1>Congratulations</h1><p>You have successfully deployed your first example of EC2 instance</p><p>Your server running on ip: <b>$(hostname -I)</b></p>" > /var/www/html/index.html
# Above line creates an html files with <h1>Congratulations heading</h1>, and givent content in <p> tags above.
W. User Data Base64 Encode
AWS encodes the user data text in base64. If your script is already encoded, select the checkbox.
Summary
The summary section displays all the settings you've configured and allows you to choose the number of instances you want to launch.
Click on 'Launch instance' to proceed.
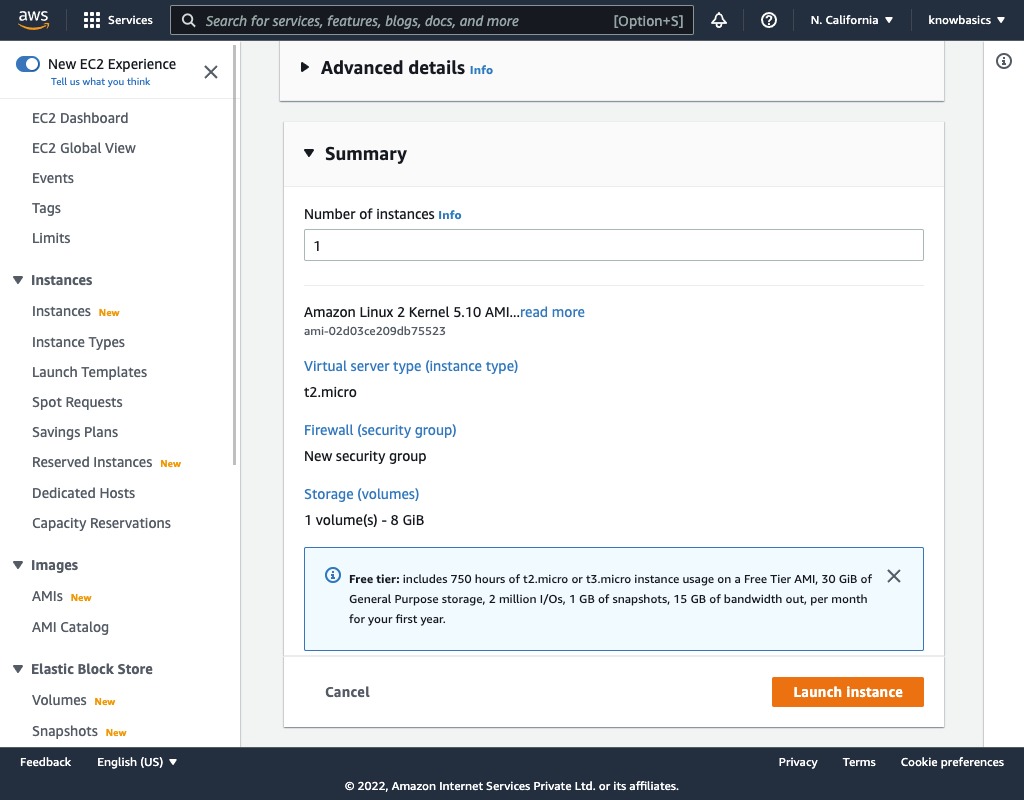
Congratulations, you have launched your first instance.